 Skip to content
A hardwired EV charger installation is a permanent, direct connection between your home’s electrical panel and a Level 2 charging unit, with no plug-in outlet in between. This setup delivers faster charging than a standard socket, supports continuous current up to 48A versus 40A for plug-in NEMA 14-50 units, and eliminates the nuisance trips associated with GFCI-protected outlets. The industry term for this type of unit is a “hardwired charging station,” and it is the preferred choice for homeowners who want reliability, speed, and a setup that adds genuine value to their property. Expect the physical work to take 2–6 hours, though the full process including permits runs 1–4 weeks.
What do you need before a hardwired EV charger installation?
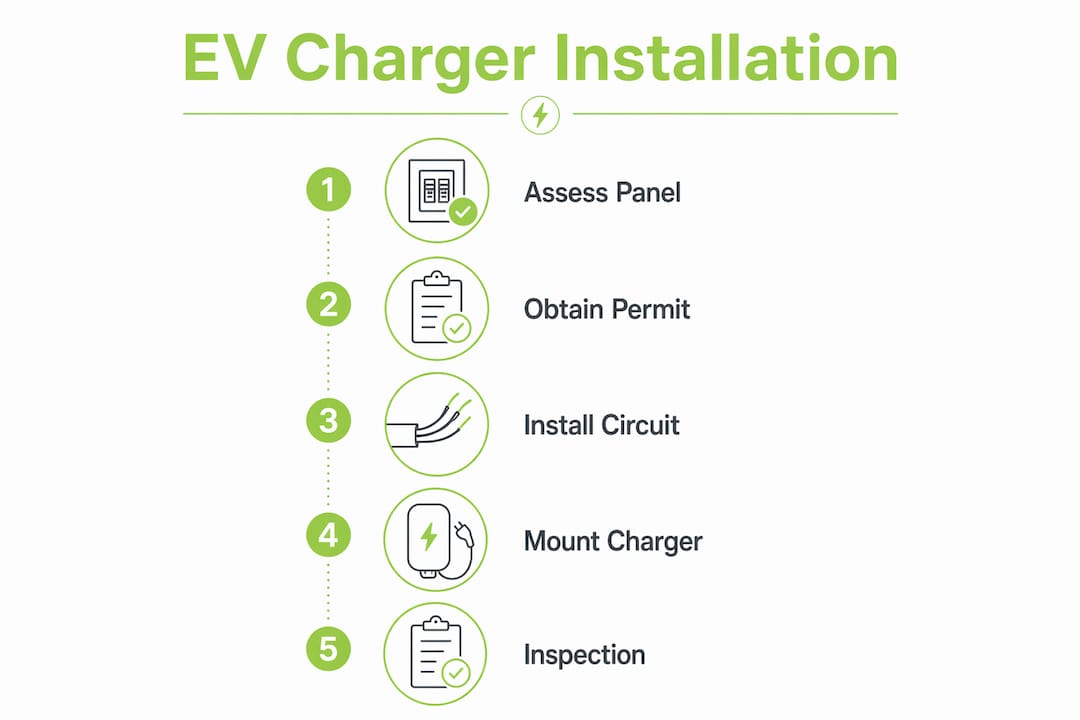
Getting the prerequisites right saves you time, money, and the risk of a failed inspection. Three things matter most: permits, panel capacity, and the right professional.
Permits and inspections
A permit is not optional. Unpermitted EV charger work can void your home insurance for fire claims and create serious complications when you sell the property. Your local authority or building control body issues the permit, and an inspection follows once the work is complete. Permitting documentation also supports eligibility for government EV incentives and rebates, so keeping those records is worth the effort.
Pro Tip: Apply for your permit as early as possible. The permit approval process is the single biggest cause of delay, often stretching the overall timeline to 1–4 weeks even when the physical installation takes only a few hours.
Assessing your electrical panel
Your panel must have a spare slot for a dedicated circuit breaker. A qualified electrician will carry out a load calculation under NEC 220.82 to confirm whether your existing panel can support the new circuit. Do not assume you need a panel upgrade without this check. Contractors sometimes recommend upgrades unnecessarily, and a proper load calculation protects you from that cost.
Tools, materials, and professional requirements
The table below covers the core materials for a 240V EV charger installation.
| Item | Purpose |
|---|---|
| Dedicated circuit breaker | Protects the new circuit at the correct amperage |
| 6 AWG or 4 AWG copper cable | Carries current from panel to charger |
| Conduit (metal or PVC) | Protects wiring, required for outdoor runs |
| Voltage tester | Confirms power is off before work begins |
| Mounting hardware | Secures charger to wall at accessible height |
Licensed electrician installation is non-negotiable for panel work. DIY panel connections carry serious fire and electrocution risks, breach building regulations, and can invalidate your home insurance. Always use a qualified, registered electrician.
How to install a hardwired EV charger at home: step by step
The process below reflects what a qualified electrician carries out. Understanding each step helps you ask the right questions and know what to expect on installation day.
-
Shut off the main breaker and verify the panel is dead. Use a non-contact voltage tester on the panel bus bars before touching anything. Never rely on the breaker position alone.
-
Install a dedicated circuit breaker. The breaker must be rated at 125% of the charger’s continuous load, per NEC 625.42. For a 40A charger, that means a 50A breaker. Breaker sizing at 125% is a safety requirement, not a suggestion. An undersized breaker will trip repeatedly and degrade over time.
-
Plan and route the conduit. Run conduit from the panel to the charger location using the shortest practical path. Shorter cable runs reduce both material costs and voltage drop, which directly affects charging efficiency. For outdoor EV charger installation, use weatherproof conduit and fittings rated for external use.
-
Pull the wiring through the conduit. Use the correct cable gauge for the circuit amperage. For a 50A circuit, 6 AWG copper is the minimum; for higher-amperage setups, 4 AWG is required. Label both ends of the cable clearly before connecting anything.
-
Mount the charger unit. Fix the charger to a solid wall or post at a height that gives comfortable access to the connector. For a garage installation, 1.2–1.5 metres from the floor works well for most vehicles. For outdoor installations, confirm the unit carries an IP54 rating or higher.
-
Connect the wiring at the charger and panel. Follow the manufacturer’s terminal diagram exactly. Connect the live, neutral, and earth conductors in the correct order. Tighten terminals to the specified torque, as loose connections cause heat and arcing.
-
Set the charger’s current limit. Configure the maximum current output per NEC 625.42 and the charger manufacturer’s instructions. Do not set the output above 80% of the breaker rating for continuous use.
-
Restore power and test. Switch the main breaker back on, then the new circuit breaker. Plug in your vehicle and confirm the charger communicates correctly. Check for any error codes on the charger display.
-
Book the inspection. Contact your local authority to arrange the sign-off inspection. Have your permit paperwork and the charger’s installation manual available for the inspector.
Pro Tip: Photograph every stage of the installation, from the panel wiring to the conduit route and the final mounted unit. These images support your inspection, your warranty claim, and any future insurance query.
The physical work across these steps takes 2–6 hours for a straightforward installation. A panel upgrade, if needed, adds time and cost to that estimate.
What mistakes do homeowners make with EV charger wiring?
The most common errors are avoidable. Each one carries a real consequence, whether financial, legal, or physical.
-
Skipping the permit. This is the most damaging mistake. Unpermitted installations can result in insurance denial for fire damage and make your property harder to sell. Buyers’ solicitors increasingly ask for electrical installation certificates.
-
Using a NEMA 14-50 outlet for a high-current charger. Plug-in outlets are limited to 40A continuous and can overheat under sustained load. NEMA 14-50 outlets can fail when used continuously at high current. A hardwired connection removes that risk entirely.
-
Incorrect breaker sizing. A breaker that is too small trips constantly. One that is too large fails to protect the circuit. Both outcomes damage your charger and your wiring over time.
-
Ignoring voltage drop on long cable runs. A cable run that is too long without the correct gauge causes voltage drop, which reduces charging speed and generates heat in the wiring. Keep runs short and size the cable correctly for the distance.
-
Attempting panel work without a licensed electrician. DIY panel work is strongly discouraged. Beyond the safety risk, it breaches building regulations and can void your home insurance policy.
“A hardwired EV charger installation done without permits and professional sign-off is not just a safety risk. It is a financial liability that follows the property, not just the owner. The cost of doing it properly is always less than the cost of undoing it incorrectly.”
The EV charger installation cost for a compliant, professionally installed unit is a one-time investment. The cost of an unpermitted installation can follow you for years.
How do you maintain and troubleshoot your hardwired charging station?
A hardwired charging station needs very little day-to-day attention, but a few regular checks keep it running reliably for years.
-
Inspect the unit visually every three months. Look for cracked casing, corrosion on the connector, or signs of heat damage around the cable entry point. Any discolouration around terminals is a warning sign.
-
Check the circuit breaker periodically. A breaker that trips repeatedly without an obvious cause, such as a power cut, points to a wiring fault or an overloaded circuit. Do not simply reset it and ignore the pattern.
-
Address a charger that fails to energise. Start with the basics: confirm the breaker is on, the vehicle is properly connected, and the charger display shows no error codes. If the unit still does not start, check the vehicle’s onboard charging settings before calling an electrician.
-
Keep your documentation current. Store your installation certificate, permit approval, and charger warranty in one place. You will need these if you make an insurance claim or sell the property.
Pro Tip: Book a visual inspection by a qualified electrician every two years. Wiring connections can loosen slightly over time due to thermal expansion and contraction, particularly in outdoor installations exposed to temperature changes.
Knowing when to call a professional electrician matters as much as the maintenance itself. Any fault involving the panel, the conduit wiring, or persistent error codes is not a DIY fix.
Key takeaways
A hardwired EV charger installation delivers faster, safer, and more reliable home charging than any plug-in alternative, provided it is carried out by a licensed electrician with the correct permits in place.
| Point | Details |
|---|---|
| Hardwired beats plug-in | Hardwired units support up to 48A continuous, versus 40A for plug-in NEMA 14-50 outlets. |
| Permits protect you | Unpermitted work can void home insurance and complicate property sales. |
| Breaker sizing is critical | Size the breaker at 125% of the charger’s continuous load to meet NEC 625.42. |
| Keep cable runs short | Shorter conduit routes reduce voltage drop and lower material costs. |
| Professional installation is non-negotiable | Licensed electricians are required for panel work to maintain safety and legal compliance. |
Why I always recommend hardwired over plug-in for permanent home setups
After more than two decades working on residential electrical installations across the South West, I have seen both approaches up close. The plug-in route looks attractive at first because it seems simpler and cheaper. In practice, it creates problems that compound over time.
The NEMA 14-50 outlet is not designed for continuous high-current use, day after day, year after year. I have seen outlets that looked fine externally but showed significant heat damage internally after 18 months of nightly charging. A hardwired connection removes that failure point completely.
The homeowners who regret their installation are almost always the ones who skipped the permit to save time or money. When they come to sell, their buyer’s solicitor flags the uncertified work, and they end up paying for a retrospective inspection or a full reinstallation anyway. The permit process adds a few weeks to the timeline, but it protects the value of the property and the integrity of the installation.
The panel assessment step is where I see the most unnecessary spending. Many homeowners are told they need a full panel upgrade when a proper load calculation under NEC 220.82 shows their existing panel has capacity. Always get that calculation done before agreeing to an upgrade.
A well-installed hardwired charging station, with the right cable gauge, correct breaker sizing, and a clean conduit route, will run without issue for the life of the vehicle and beyond. That is the standard every homeowner deserves.
— Craig
Centralec-electrical: professional EV charger installation in the South West
Centralec-electrical has delivered compliant electrical installations across the South West for over 23 years. As a NICEIC-approved contractor, every EV charger installation meets current UK regulations, comes with full certification, and is backed by a satisfaction guarantee with no hidden costs.

Whether you need a straightforward garage installation or a more complex outdoor setup with a panel assessment, the team handles permits, wiring, and inspection sign-off from start to finish. Check the EV charger installation requirements page for a full breakdown of what your project involves, or visit the installation cost guide to understand what to budget before you book.
FAQ
Does a hardwired EV charger need a permit in the UK?
Yes. Any new dedicated circuit connected to your home’s electrical panel requires a permit and inspection from your local authority or building control body. Skipping this step risks insurance complications and property resale issues.
How long does a hardwired EV charger installation take?
The physical electrical work takes 2–6 hours. The full process, including permit approval and inspection, typically runs 1–4 weeks depending on your local authority’s workload.
Can I install a hardwired EV charger myself?
Panel work must be carried out by a licensed electrician. DIY connections to the consumer unit breach building regulations, carry serious safety risks, and can invalidate your home insurance policy.
What size breaker do I need for a hardwired EV charger?
The breaker must be rated at 125% of the charger’s continuous load. For a 40A charger, that means a 50A breaker, in line with NEC 625.42 requirements.
Does a hardwired charger add value to my home?
A certified, permitted hardwired charging station is an asset that buyers recognise. Unpermitted installations, by contrast, can reduce your property’s appeal and complicate conveyancing.